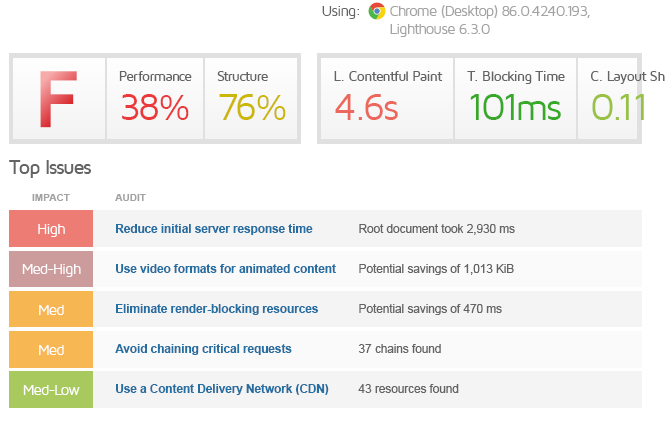
We were asked to optimise a WordPress (Divi theme) website. By doing just TWO things that were FREE, we took the site from THIS…
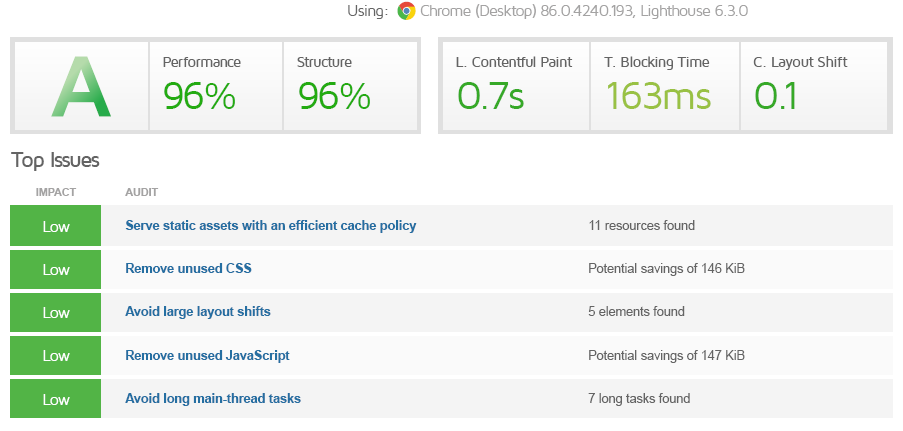
To THIS….
First impressions are critical for your website, and website performance is always the first experience a visitor gets even before seeing your content. If your website loads fast – your visitor is immediately happy. We were asked to optimise a slow website and thought we’d take you through it. This article assumes you know a little about websites and hosting, and we trust you’ll take a full website backup before doing any changes such as this – so we’re not going to take baby steps.
SO WHAT DID WE DO?
1. Leverage a CDN
A CDN, or Content Delivery Network / Content Distribution Network, is a global network of web servers distributed around the planet. When you use a CDN, a visitor checking out your website is getting access to a copy that’s close to them geographically. Think of hosting your website in the United States and accessing it from Australia or vice-versa, it’s going to experience delays ‘over the wire’. A CDN keeps a copy of your website close to your visitors. For this case study, we set up the website on the Cloudflare CDN Free plan. Not only do you get to utilise their global CDN, you also get DDoS protection.
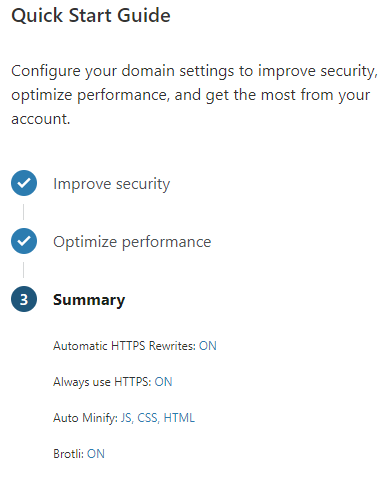
Yeah – we sign up for the FREE Cloudflare plan and we’re not ashamed to admit it. It does the job for what we need it for, and for free it is an amazing service. When you add your site it will scan your DNS zone records and import them in to Cloudflare. You’ll then need to change your primary and secondary DNS for your domain name so they use Cloudflare. You can then check to see if they’ve been picked up and if your domain is activated in Cloudflare you’ll also get an email to confirm as such. You can then also run through the Quick Start, and as you can see in the image below we’ve turned everything on: –
- Automatic HTTPS Rewrites
- Always use HTTPS
- Auto Minify: JS, CSS, HTML
- Brotli
These settings may not be right for every one, especially the Minify settings. Keep an eye on your site when you make these changes to ensure everything is displaying correctly. That’s it for Cloudflare as far as this exercise was concerned.. Of course there’s more you can do with Cloudflare, but if you’re seeing the ‘Cloudflare is now protecting your site’ notification, then back away slowly..
2. Implemented LiteSpeed Web Cache Manager
This web host used the LiteSpeed web server and as such have the LiteSpeed Web Cache Manager in the Advanced section of the cPanel. This is obviously specific to this installation, but there’s no reason the concepts that we talk about here can’t be applied with other caching plugins for you folks on other web servers such as Apache.
You want to enable LiteSpeed Web Cache Manager, so open it up in cPanel and you’ll probably need to scan for your WordPress installation if this is your first time doing this, and click Enable. LS Web Cache Manager doesn’t like other caching plugins, so if you’re already using one on your website it won’t allow you to enable until the other plugins have been deactivate / removed. After you’ve activated LS Web Cache Manager, you’ll have the plugin installed and activated on your WordPress website – so jump in to your WordPress dashboard and the first thing you want to do is hook LS Web Cache in to your Cloudflare integration. So go to the LiteSpeed cache menu, click CDN and scroll down to the bottom of the settings page and you’ll see this…
So.. (if you haven’t figured this out already), click ON then enter the details it needs (email address, API, domain name). From here on, you can optimise the settings in LiteSpeed Cache to suit your needs specifically Image Optimisation and Page Optimisation. Ensure you run through the tabs on the Page Optimisation menu, specifically CSS, JS, Optimization and Media. We tend to start off with setting everything to ON and then work our way back depending on if anything breaks. Settings that combine and minify tend to cause the most issues. Each website is different based on many factors such as themes and plugins so it’s really a case of see what works for you. Also, ensure you try out Lazy Loading of images as there’s often a good performance boost with this setting.
CONCLUSION
You’ll see from the above that making some simple but significant changes to your website can make an amazing difference to your site speed. This not only improves the User Experience (who likes waiting when the click a link?), but it also has the benefit of improving your SEO as site performance is a Google SEO Ranking signal. Of course, there are many other options to improve site performance and this can be highly variable depending on your situation (ie., hosting, website content, etc.). Using analysis tools such as GTMetrix can help further analyse your website and report on the specifics of where you should focus your attention. For further information, or for assistance in getting results like these for your website, please get in touch

